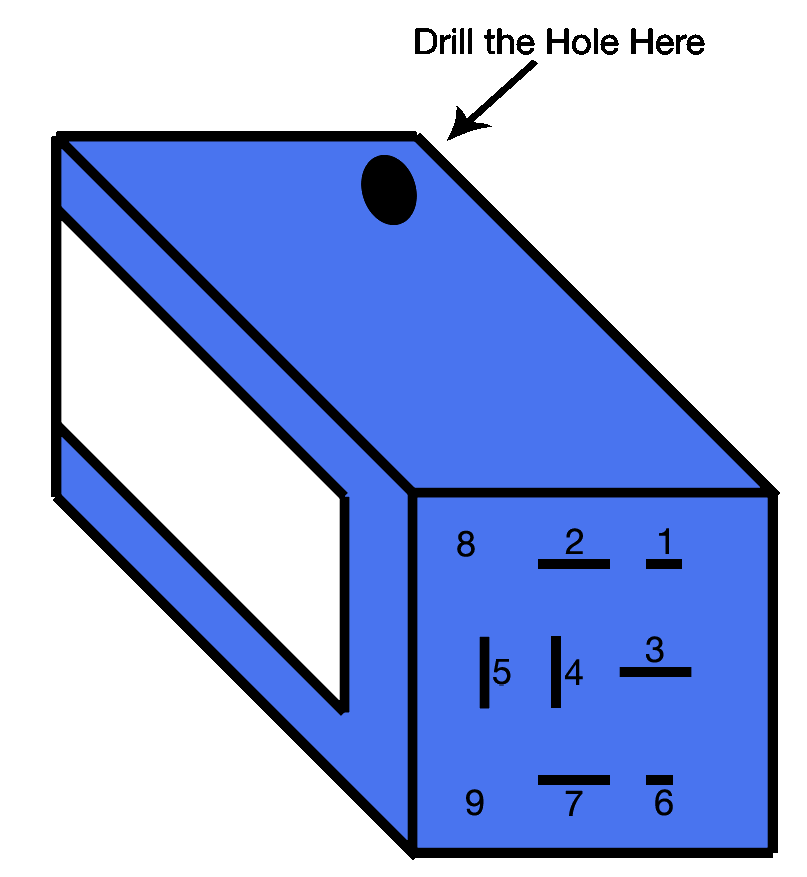
Intermittent Wiper Dial
There are a few ways to add intermittent wipers, which was not an option on earlier Boxster's. The simpliest solution is to install a VW wiper relay that enables you to set the wiper interval by holding the wiper stalk for x seconds to set the interval. There is also an OEM solution that adds a rain sensor to the windshield.
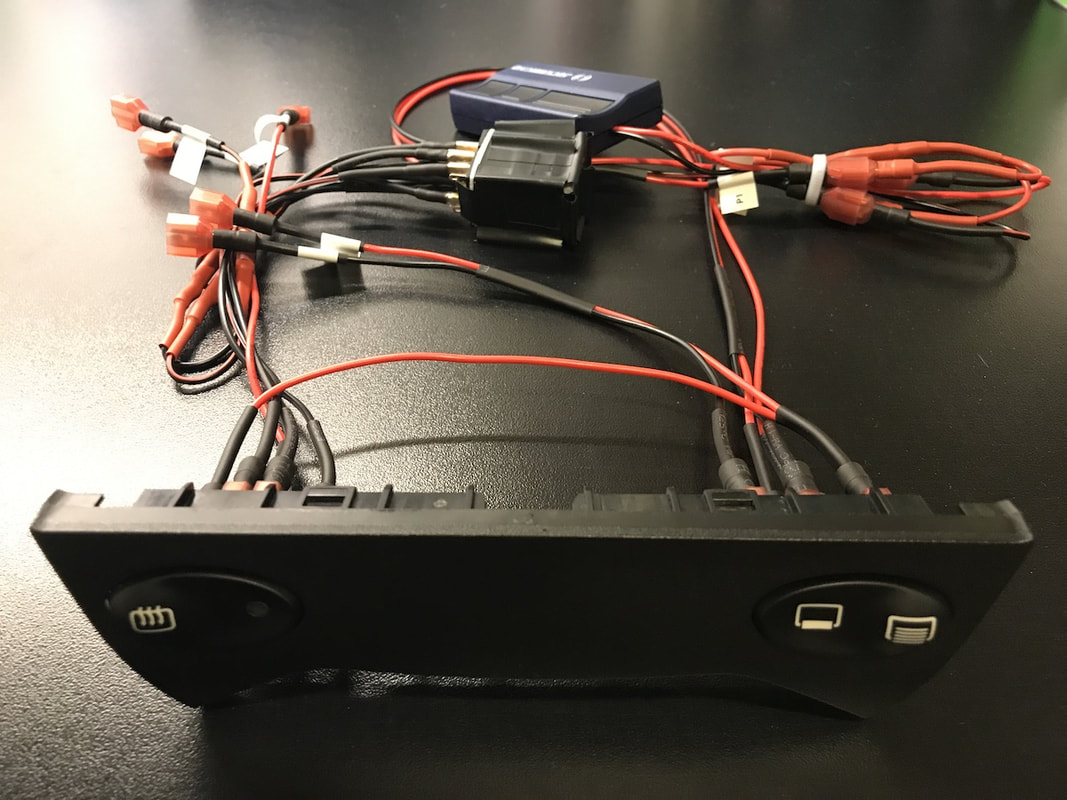
I opted to install a wiper dial, which was the intermittent wiper option available on the 996 and what the 986 would have had if the option was available. I have full instructions on the parts needed, and installation instructions in the PDF below. I also installed a dash spoiler switch at the same time, so that is also in these instructions. I made this PDF several years ago, so I apologize for any typos, and feel free to email me if you have any questions. Link to PDF
I opted to install a wiper dial, which was the intermittent wiper option available on the 996 and what the 986 would have had if the option was available. I have full instructions on the parts needed, and installation instructions in the PDF below. I also installed a dash spoiler switch at the same time, so that is also in these instructions. I made this PDF several years ago, so I apologize for any typos, and feel free to email me if you have any questions. Link to PDF
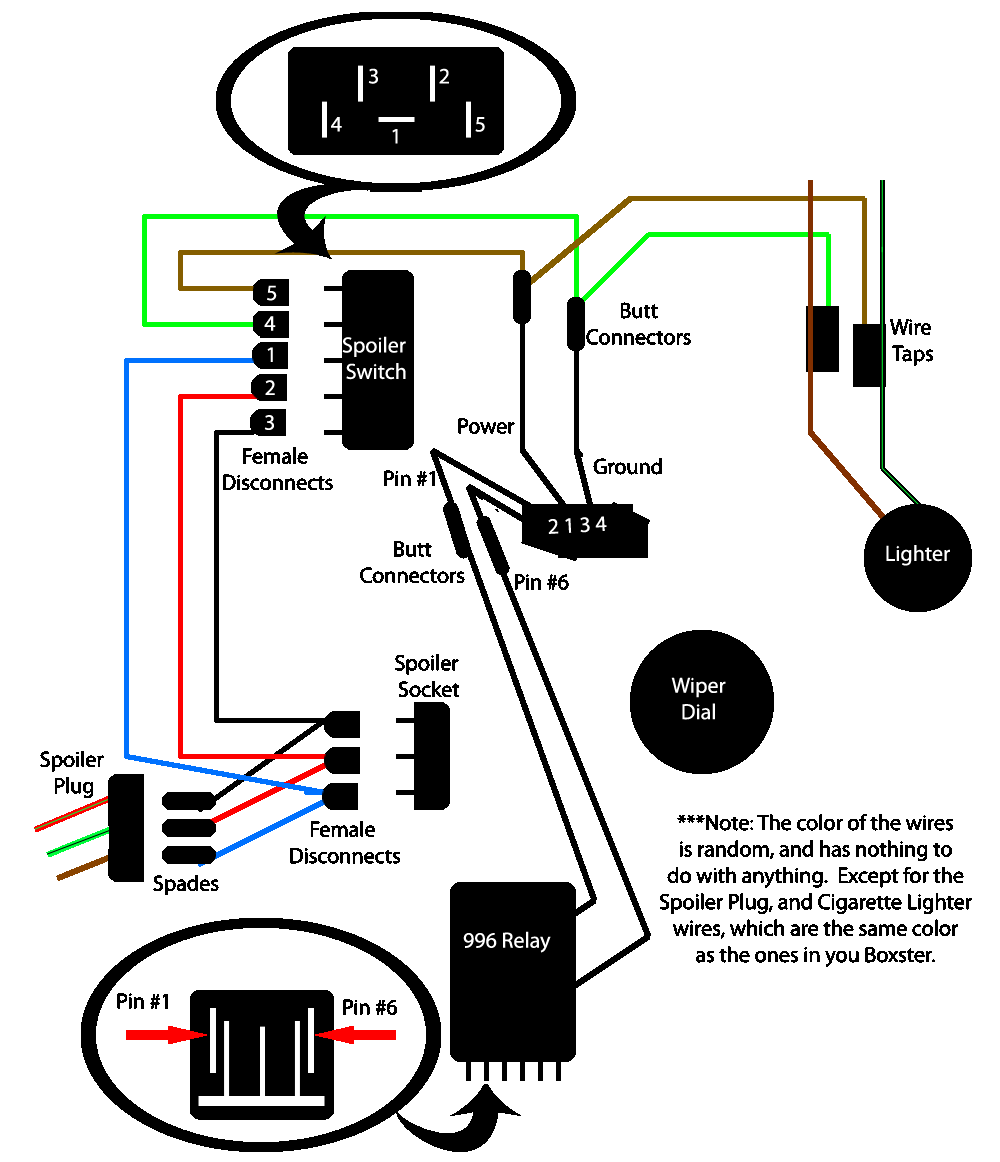
Spoiler Switch & Indicator
|
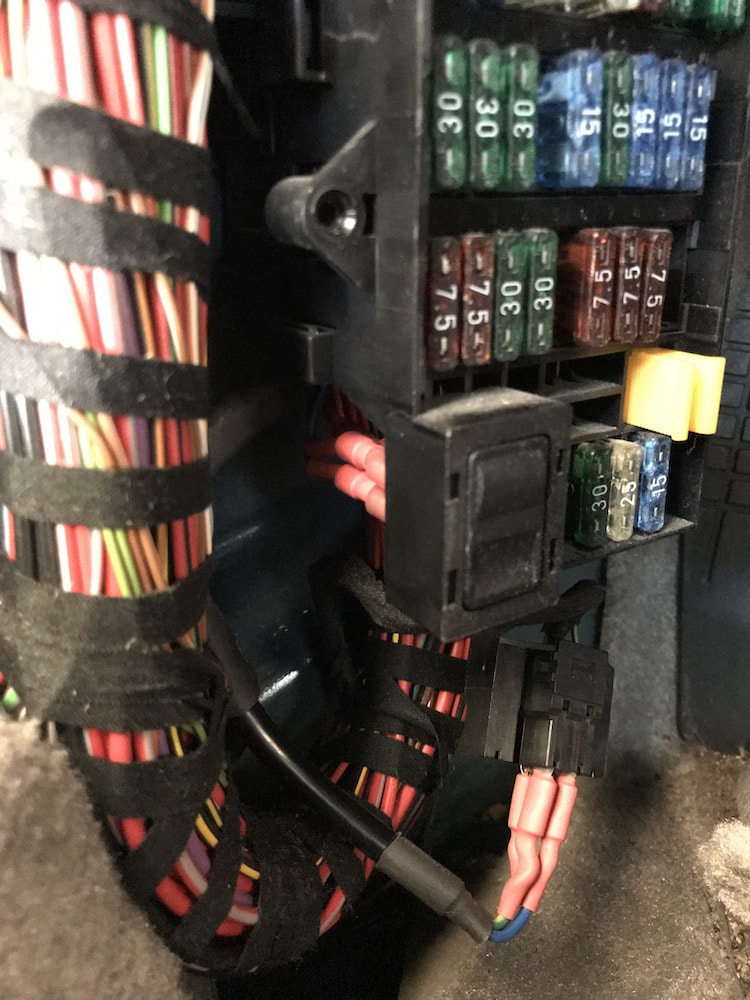
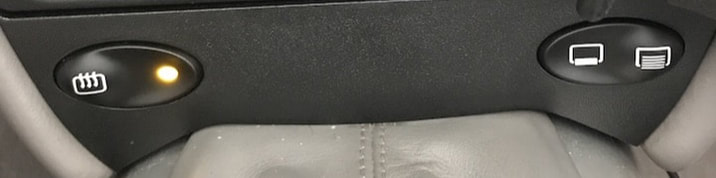
The dash spoiler switch is a really simple modification that adds a dash mounted switch to control the spoiler, instead of having to reach into the footwell by the fuse panel. I simply removed the carpet around the fuse panel and inserted a wiring harness that "spliced" inbetween the footwell spoiler control plug and the OEM wiring, that I could then run to the dash mounted spoiler switch.
I installed this at the same time as my intermittent wipers, so the wiring harnesses were created together. For detailed pictures, see that modication above. I also have a Spoiler Indicator light installed, however I purchased it from eBay, and do not have information on how it should be wired. |
|
On-Board Computer Switch
This is the one that started it all for me, the first big modification I made to my 986 after the fuse jump DRL hack.
All 986 Boxsters came equipped with an On-Board Computer which is built into the instrument cluster, however not all of them have this feature activated. The feature was orginally only available by purchasing the car from the factory with a 4th steering column stalk which had OBC controls.
However, many people without the 4th stalk had the OBC enabled, which allows the instrument cluster to display the outside temperture, but does not allow you to access anything else, because there is no control to cycle through the different OBC "pages". This modification allows you to cycle through the OBC in one direction, by adding a dash button.
You can also add two buttons to cycle in two directions, which is only necessary if you want to enable the Speed Gong, which allows you to set a specific speed and the car will chime when that speed is reached. The other option is to add an OEM 4th stalk to the steering column. The OBC can be enabled by the Durametric.
The OBC button hack is relatively straight forward, and instruction for it can be found here.
Radiator Fan Switch & Garage Switch
|
I installed a two button 996 batwing with a 996TT Targa switch often used as a garage switch, and a defroster switch used to manually trigger the high speed radiator fans. Both switches have nighttime illumination, and the switch LED indicates when the radiator fans have been manually triggered.
The basics of the fan mod are to ground relay Pin 85, however since the OEM switches are momentary a latching relay is required. The latching relay also allows the switch LED to function. You can find a DIY Guide for these modifications on the blog. |
|
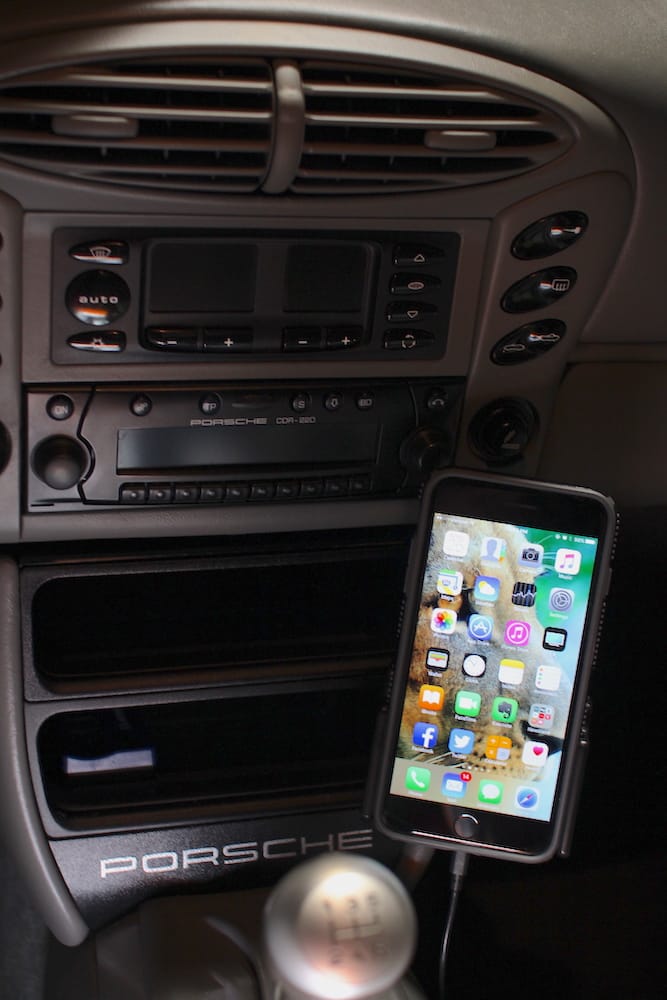
iPhone/iPod Connection & Cradle
|
The 986 came with several different head units, while you can always add an auxilary input by placing a connection between the radio antenna and the radio input, my 986 came with a Becker CDR-220 which is one of the few OEM head units that allows you to add an AUX input. I have kept my OEM Becker HU primarily because I prefer the way it looks compared to aftermarket units with chrome and LED's. If you want a double DIN radio, there is a tasteful 986/996 specific trim kit available.
I installed the Becker AUX input which terminates into 2 RCA plugs. I have that connected to a ground loop isolator which helps elimate any buzzing or hissing that tends to plague auto electronics. The final part of the install has changed several times to adapt to changing connection types (30-pin iPod to Lightning). My current install connects the ground loop isolator to a PAC IS3301 which terminates as a USB port. This allows me to use any "USB to various connection cable" I would like, such as Lighting, mini-USB, etc. The PAC IS3301 also provides power via USB, which I have wired to the 12V switched power and ground provided by the Phone Connector under the dash (see the q&a page for more info). I then installed a ProClip mount and cradle to hold my iPhone, which clips onto the leatherette console trim. I highly recommend purchasing a spare leatherette trim piece (PN: 996 552 092 06) to use, as the phone mount clips very tightly and will damage the trim. The mount and cradle works very well with my larger iPhone Plus and it does not interfer with any controls, or the shifter. My only complaint is that the clip from the mount does separate the leatherette trim piece from the center console shelf enough to see where the back of the leatherette trim piece. However, when a phone is in the cradle this is not visible. |
|
Rear Speakers & 996 Amplifier
My Boxster came with Hi-Fi sound, and while I never had any major issues with the sound system, I felt that the rear console box cubbies where a complete waste of space, since they are too small to store anything. I purchased the OEM rear speaker kit for $130, and installed four 3.5" speakers in place of the cubbies. I originally had the rear speakers powered by the head unit, but later upgraded to a 996 6x40W amplifier, which requires a tiny modification to the plastic plug to fit perfectly. The rear speakers fill out the sound in the Boxster, and it is great upgrade.
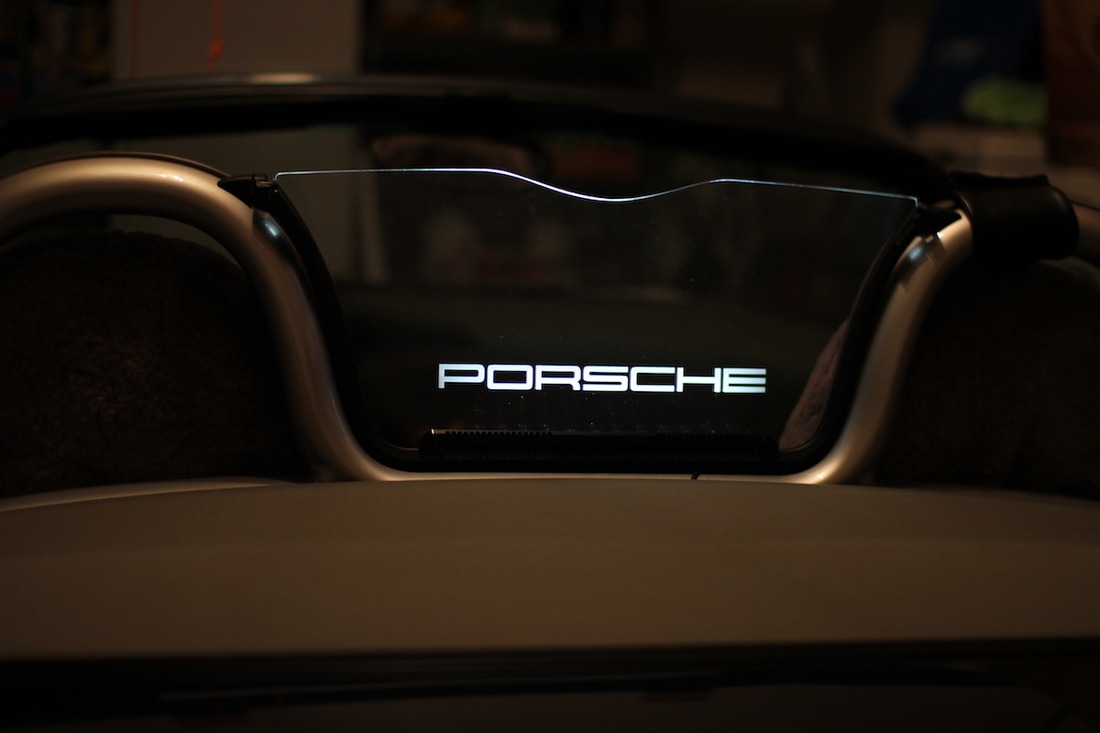
Skybreaker Windscreen
|
This illuminated windscreen was part of a custom project that happened on 986forum. The plexiglass features a small LED bar that will illuminate any engraving on the windscreen. I went with a simple 'PORSCHE' logo which is a bit lower and wider than the standard engraving. I wired the illumination control the same route as the rear speaker wiring, under the passenger door sill and powered by the phone connector.
The lower logo stance allows an unobstructed view when using the rearview mirror. |
|
Fire Extinguisher & Mount
I found a Halon Fire Extinguisher and BK 986/996 Mount on eBay for $130, an unusually good deal. The BK mount attaches to the passenger seat with two screws on the front and a bolt in the back. I replaced the bolt that was supplied with a nylon bolt to elimate any rattling.
Sheepskin Seat Covers
I had a local shop make two custom sheepskin seat covers for my 986 for about $250. They make the seats a lot more comfortable in the winter and on road trips, but I remove them for track days, as they keep you from being 'gripped' by the seat.
US Spec Cigarette Lighter
The cigarette lighter that comes with the 986 is sized for the European market and you may notice that many US accessories will not fit snugly and become disconnected easily. The simple fix is to swap the cigarette lighter for the US spec one. You can find instructions on the parts needed, and how to do the swap online.
Valet Key
The 986 originally came with a plastic key that could be used to lock/unlock the doors and glove box (I am unclear if the OEM valet key could also be used to drive the car). My 986 did not come with a valet key, so I had one made for about $40. Any good locksmith with a laser key cutter should be able to make one. The valet key is convenient when at the beach or other situations where you do not want to take an electronic key.
It is important to note that regular 986 keys have an imbedded chip that communicates with the car to disable the immobilizer when you turn the key to start the car. A valet key will not have this chip and can only be used for the doors or glove box, if you attempt to start the car with a valet key the immobilizer will be triggered, and you will need to have the car towed to a dealer to be unlocked.
It is important to note that regular 986 keys have an imbedded chip that communicates with the car to disable the immobilizer when you turn the key to start the car. A valet key will not have this chip and can only be used for the doors or glove box, if you attempt to start the car with a valet key the immobilizer will be triggered, and you will need to have the car towed to a dealer to be unlocked.
Additional
|
'986' Batwing Decal (replaced 'Porsche' decal)
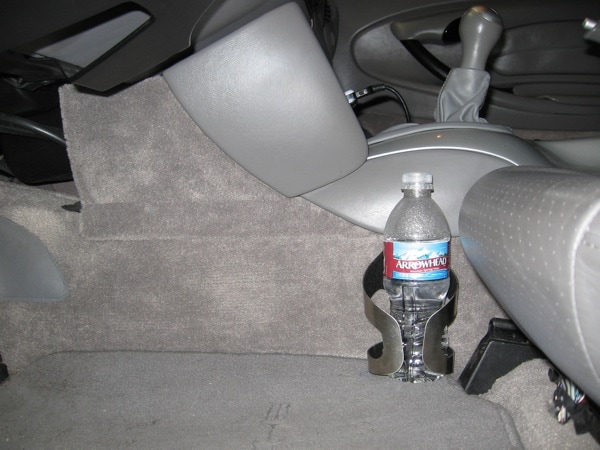
Magnetic Door Sills Replaced CD Holder w/ Shelf Removed Airbag Warning Labels Ultimate Cupholder (pictured) Lumbar Support Trunk Mats |
|
Disclaimer
This website is a personal project, and any information contained on this website should be independently verified. I accept no liability and/or responsibility for the accuracy of any information on this website, and/or any damage you incur from reading or following any of the information on this website. This website contains documentation of my own modifications, upgrades, and other work, however your results may differ. I encourage everyone to do their own research and verify any information themselves. This website may be directly linked to without specific permission, but the contents may not be copied, hosted, transmitted, etc in any medium without express permission. Thank you!
This website is a personal project, and any information contained on this website should be independently verified. I accept no liability and/or responsibility for the accuracy of any information on this website, and/or any damage you incur from reading or following any of the information on this website. This website contains documentation of my own modifications, upgrades, and other work, however your results may differ. I encourage everyone to do their own research and verify any information themselves. This website may be directly linked to without specific permission, but the contents may not be copied, hosted, transmitted, etc in any medium without express permission. Thank you!
