Hardtop
Info & Safety
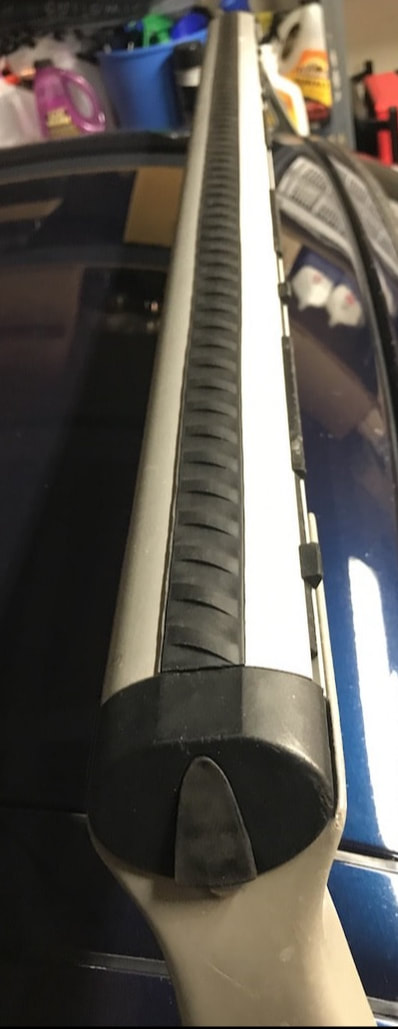
The 986 hardtop weighs about 55 pounds and is primarily constructed out of aluminum. While it is more more aerodynamic and quieter than the softtop, the hardtop does not provide any additional safety or protection.
The installation of the hardtop requires installing two spinlocks which provide the B-Pillar mount points for the top. These did not come standard from the factory unless the car shipped with either a hardtop or speedster humps.
Removal & Storage
There are a few options for storing a 986 hardtop. The most common option is a rolling cart, which holds the top upright. Porsche offered two versions of a rolling cart, one was a simple folding cart made from metal tubing that was able to fit in the rear trunk when disassembled. The other cart option was the hardtop wall mount, mounted on a rolling base that also held a full set of wheels. There is also a winch option that can be mounted to the ceiling in a garage to lift and store the hardtop in the air.
Two people are required to remove the hardtop for storage on a wall mount or cart. It is not because the top is particularly heavy, but because it is a large and awkward shape. I recommend lifting the back up and out of the spinlocks, then lifting the top up and out of the A-Pillar, then walking toward the rear of the car.
Ears?
Some early '97 and '98 hardtops had 'ears,' or color matched plastic caps on the B-pillar which were used to mount the Porsche Roof Transport System (RTS). However, due to excessive noise, Porsche revised the recommended installation of the RTS to the B-Pillar body mounts (located under the clamshell wingtips), even when using a hardtop. The hardtop ears where discontinued in late 1998, and the RTS was no longer sold with hardtop ear mounts.
Adjustment
Hardtops tend to 'settle' on the car they are installed on, which means used tops often need to be adjusted, especially for the first few weeks after being installed. There are two types of adjustments that may be necessary, adjusting the window tracks and the body.
Window Adjustment
If the windows are not aligning vertically with the hardtop, you may need to adjust the door window regulator. If the windows are not aligning with the hardtop track horizantally, you can adjust the window seal tracks. To do this, place the hardtop upside down on a soft surface (carpet, grass, etc), and carefully pull the rubber window seal out of its metal track. Beginning near the spinlock lever, you should should see two screws under the rubber. Loosen the screws and adjust the seal track as necessary and retighten. Then replace the rubber seal into the metal track. I used a flathead screwdriver to help replace the seal into the track.
Body Adjustment
Adjusting the hardtop is important to help reduce exessive squeaking and/or wind noise caused by poor fitment. I repeated this process several times the first few weeks after I installed my hardtop, as it was settling to my car. I also repeat this process when I reinstall the hardtop if it has been off the car for an extended period.
Inside the hardtop on each side, just above the spinlock levers there are two plastic covers that pop out to reveak three hex head bolts. To adjust the hardtop, secure the A-pillar clamp, then loosen the hex bolts on each side of the top. Have an assistant push forward and down as hard as possible on the hardtop, and tighten the bolts on each side. You may want to lock/unlock the spinlock levers while doing this. Repeat as necessary.
Strut Braces
This is extremely subjective, but I have found that installing strut braces can have an affect on reducing noise caused by the hardtop. I drove for several years with only a front strut brace and lower stress bar, and I would consider these to have had a minimal affect on the noise caused by the hardtop. I recently installed a mid strut bar, and it has made a significant difference. The mid strut brace does not allow the body to flex as much underneath the hardtop, which reduces the squeaks and other noise caused when driving on uneven roads with a hardtop.
Roof Transport System
The Roof Transport System, or RTS, is an optional roof rack for the 986 Boxster. The rack is model specific and a 986 RTS will only fit a 1997-2004 986 Boxster. The RTS consists of several components, including two side support bars, two cross bars, and a tool box with A-Pillar brackets, B-Pillar brackets, hardtop ear B-Pillar brackets (included with earlier kits only), and the hardware required to install the RTS. If you are looking to purchase a RTS used, you must make sure it includes all of the necessary hardware, as several of the items cannot be purchased separately. I have included a list of the components below and answers to common questions.
What is the RTS weight rating?
About 175 pounds.
Can I put the soft top up or down with the RTS installed?
No, the top cannot be put up or down with the RTS installed.
Does the RTS have to be completely disassembled to be removed?
No, with two people it is possible to remove the RTS without disassembling it.
The A-Pillar mounts are a pain to install, can I leave them on the car?
Yes, I left mine on for several years. I actually painted them to match the car with touch up paint, however, the paint did not hold up very well after a few years of use.
Does my 986 have the mount points for the RTS?
Yes, every 986 from 1997-2004 came from the factory with the four mounting locations for the RTS.
Can I use Porsche accessories with the RTS?
Yes, the cross bars are similar to the roof racks on other Porsche models, and things like the Porsche ski rack, bike rack, etc will fit the RTS cross bars correctly, and can be slid onto the cross bar and locked. If you choose to use non-Porsche holders, make sure they will fit oval crossbars. My Thule roof box mounts just fine with oval rack mounts.
Why does one of the crossbars have rubber?
I don't know why, by that one should be mounted in the front with the rubber facing forward, toward the front of the car.
Should the cross bars have rubber that fits into the tracks?
I cannot say if the RTS came from Porsche with rubber for the tracks, but you can purchase it aftermarket. Thule Aero Bar track rubber fits the RTS perfectly, it's $7 per strip and can be cut to size with regular scissors. It may or may not help with the aerodynamtics of the RTS, but is certainly makes everything look much cleaner.
List of Tool Box Hardware
(the part numbers are the result of a lot of investigation, and I am not 100% certain they are all correct)
2 - A-Pillar Bolts (PN: 900.249.033.00, available)
4 - B-Pillar Body Mount Bolts (PN:900.249.047.00, M6x35, available),
4 - B-Pillar Ear Mount Bolts (no part number, M6x16)
8 - Cross Bar Screws w/ Washers (no part number, Pan-head Screw Hexagon Socket M6x16)
2 - B-Pillar Ear Mounts (no part number, not available separately)
2 - B-Pillar Body Mounts (PN: 996.801.503.00, no longer made)
2 - A-Pillar Mounts (PN: 996.801.501.00, no longer made)
2 - B-Pillar Locks (PN: 996.801.507.00, no longer made)
1 - B-Pillar Lock Socket (PN: 000.044.000.31, no longer made)
1 - RTS Tool (not available separately)
Not Pictured:
2 - Side Support Bars (not available separately)
2 - Crossbars (not available separately)
4 - Crossbar Locks (PN: 996.801.209.00, available & includes keys)
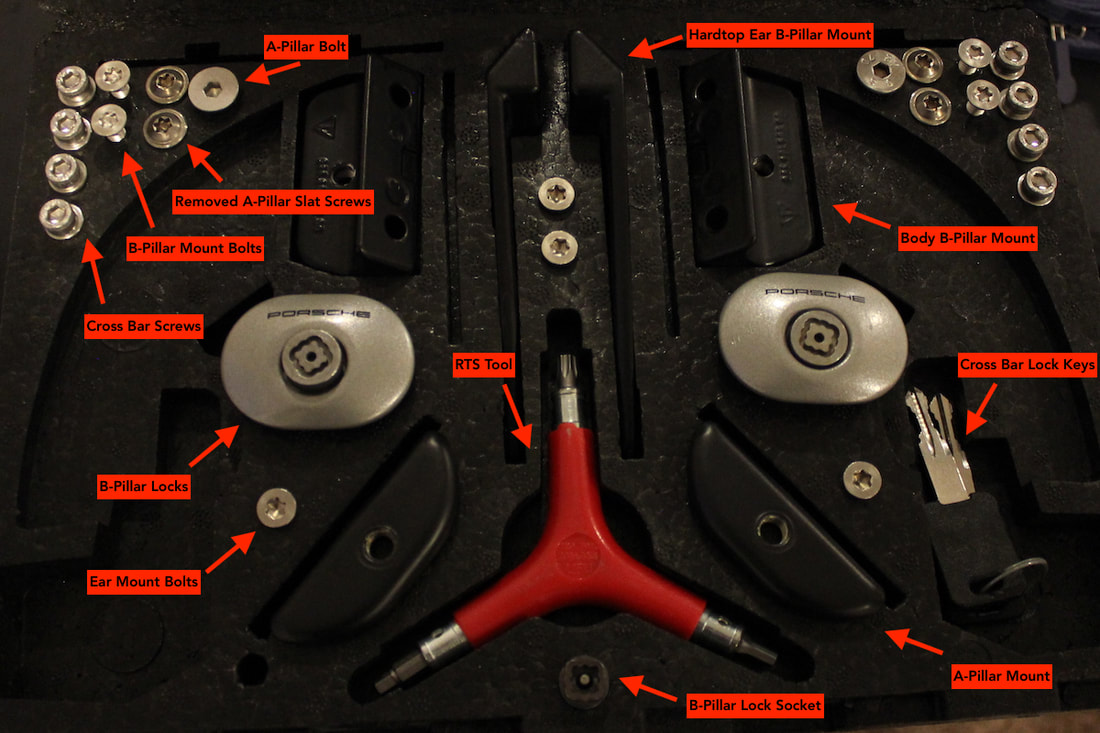
Note: The 'Removed A-Pillar Slat Screws' are not part of the kit, but are the screws installed inside the A-Pillar along with a plastic slat/shim that must be removed to install the A-Pillar mounts. The cutout between the B-Pillar Body and Ear mounts is there to hold the plastic slats/shims, and the cutouts at the top of the box are to hold the clamshell wingtips that are removed to install the B-Pillar body mounts.
More Info on Ears, Hardtops, and the RTS on 986forum:
I believe I can be of some assistance, I have an early hardtop (with ears) and the Porsche Roof Transport System (RTS). Firstly, the only difference between the two hardtops are the ears, which is just a small plastic cap behind the windows which you can pop off to mount the RTS. However, Porsche quickly abandoned this design and removed the ears from the hardtop.
The RTS was sold with mounts to be fitted to hardtops with ears or directly to the body by popping off the 'wingtips' just behind the door / in front of the clamshell. When the hardtops with ears were discontinued Porsche issued a TSB which advised everyone to mount the RTS directly to the body (under the wingtips). I have mounted my RTS both ways, and suggest the body mount (under the wingtips) because it is a lot sturdier and quieter.
To your other question, the RTS is the only rack available for the 986, unless you are looking for a trunk mounted luggage rack. I am actually surprised Porsche even made a roof rack for a convertible, and no one else offers anything 986 specific or universal that would work. The main problem is that the roof has too much of a curve to stick or clip anything to it.
I even investigated mounting a ski rack to a trunk mounted luggage rack, but that presents two issues. The trunk racks cause paint damage and the angle is not steep enough to clear the top. I suppose you could weld a rack onto the hardtop, but it's made of aluminum and there is a good chance it would deform under any significant weight. The RTS is rated for 175 lbs.
I have a 6' Thule box I mount on my RTS in the winter, and a few others have mounted bike, surf, kayak racks. The RTS bars are oval and you can use most generic ski, bike, etc carriers. I will say my 986 handles horribly with a roof box, way too top heavy, and I bought the slimmest box available. But it sure looks cool.
Airbag Deactivation Buckle
To install a car seat in the passenger seat of the Boxster safely, you need an airbag deactivation bar. The bar is fitted just under the passenger seat with a seat belt buckle. When a Porsche child seat with the correct buckle is used it will deactivate the passenger side airbag.
Installing the bar alone is not enough to deactivate the airbag, the bar must be activated with a PIWIS, the Porsche Diagnostic Tool, or by a mechanic with a PST2. It may also be possible with a Durametric Pro, however I cannot firm this.
A lot of people prefer to use non-Porsche car seats, so they must retrofit a buckle to fit into the deactivation bar. This can be accomplished by modifying a 944 seat belt buckle, which involves cutting a groove into the buckle. You can download a few PDF's I have saved to help you accomplish this here.
*I recently saw a UK Porsche parts store was selling individual buckles.
Cup Holders
Early Boxsters came with cupholders that clipped into two holes on the outside edges of the side air vents (my all leather interior does not have these holes). Unfortunately, they are extremely flimsy and often break the air vent, which caused Porsche to stop offering them. However, they can still be found as an accessory.
Porsche later offered dash mounted cup holders, in the highest DIN center console position, just below the center air vents. However, these cup holders also have an extremely poor design, as they are too shallow to properly secure a cup, which makes them extremely prone to spilling all over the dash, radio, and passengers. Most people remove these cupholders in favor of an extra center console shelf. These are also still available as an accessory.
The best cupholder for the 986, and what I currently use, is the Ultimate Cupholder. An aluminum cradle that slips under the lower center console and rests on the floor. The upper clip holds the cupholder in place, and the drink rests on the floor. These are extremely secure, and work really well.
Another very inexpensive variation is to cut a circle in a rectangular piece of foam, sized for the center console/armrest storage compartment. However, with this solution the console lid will often rest on the drink, and it is an awkward position to reach while driving.
Disclaimer
This website is a personal project, and any information contained on this website should be independently verified. I accept no liability and/or responsibility for the accuracy of any information on this website, and/or any damage you incur from reading or following any of the information on this website. This website contains documentation of my own modifications, upgrades, and other work, however your results may differ. I encourage everyone to do their own research and verify any information themselves. This website may be directly linked to without specific permission, but the contents may not be copied, hosted, transmitted, etc in any medium without express permission. Thank you!
This website is a personal project, and any information contained on this website should be independently verified. I accept no liability and/or responsibility for the accuracy of any information on this website, and/or any damage you incur from reading or following any of the information on this website. This website contains documentation of my own modifications, upgrades, and other work, however your results may differ. I encourage everyone to do their own research and verify any information themselves. This website may be directly linked to without specific permission, but the contents may not be copied, hosted, transmitted, etc in any medium without express permission. Thank you!
